This episode features ST Writer, originally released in 1985 by Atari. It was developed by Dan Oliver and John Feagans in 2 weeks as a direct port of AtariWriter from the Atari’s 8 bit computer line.
Podcast: Download
If you like this episode, or the Atari ST, you may like my other work “1632 ATARI podcaST” found here: https://1632podcast.info
Box and Supplement Scans
ST Writer was free software from Atari. It was distributed in electronic form only via the Atari BBS and magazine disk inserts.
ST Writer in Action
For Atari 8 bit readers, the ST machine must first be booted to the operating system before launching a program:
The GEM desktop (hard drive as device C). I prefer a Little Blue Desktop rather than the Little Green Desktop:
TOS version:
Open the drive, navigate to the folder holding the ST Writer program, and double click STWRITER.PRG to launch:
Main menu (without GEM enabled, pre version 2)
Main menu with colors switched via Transform. Colors carry over into the editor as well:
Enabling GEM from the main menu via mouse left click (in version 3, but works the same in all all versions above 2):
Main menu (with GEM enabled, version 3, with About displayed):
Main menu (with GEM enabled, version 4):
About version 4:
CREATE File
The edit screen as it appears when creating a new document (version 1). The other versions are similar, but include additional information in the inverse display window:
DELETE File
Without GEM
Enter the filename:
Confirm the delete:
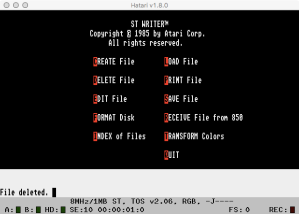
File deleted confirmation:
With GEM
Selecting the filename:
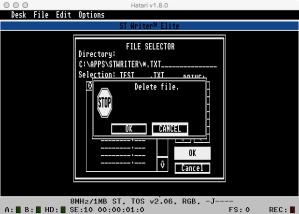
Confirm the delete:
File deleted confirmation:
EDIT File
This is what editing an original AtariWriter document looks like when editing with AtariWriter:
Thought ST Writer is AtariWriter compatible, if you do not import it through the “RECEIVE” or “AtariWriter” menu options, it is completely useless without extensive manual reformatting. This shows editing a non-imported AtariWriter (original) file (same as above). It needs extensive reformatting:
This shows editing a properly imported AtariWriter (original) file (same as above). No reformatting is needed:
The first version of ST Writer won’t import AtariWriter Plus or AtariWriter 80 files properly, though later versions of ST Writer do. These two screen shots show the very top and bottom of an non imported AtariWriter Plus document. Extensive formatting is required for it to be useful:
FORMAT Disk
Confirmation when GEM is not enabled:
Confirmation with GEM enabled:
INDEX of Files
First select the screen or printer:
Then enter the directory to display:
Files are displayed, with ST Writer files tagged. And you are given the opportunity to print:
Files are tagged with TM (trademark) in the latest versions of ST Writer:
LOAD File
Enter the name of the file to load (non GEM):
If there is an unsaved file in memory you will be prompted to erase it:
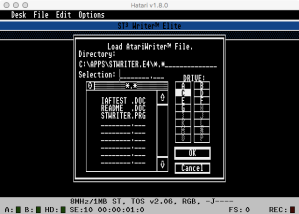
Loading with GEM enabled is a much simpler affair:
PRINT File
First select output to Printer, Disk, or Screen:
Enter the number of copies:
Select if you want to print the whole document or not. If not you will also enter the start and end pages:
Printing with GEM is much simpler. All the options are presented at once:
While printing to either screen or printer, you can press control-s to pause printing:
Printing to the screen with the output paused. Any key resumes:
When printing to disk file, nothing is output to the screen except the message “Printing to disk file.”:
SAVE File
Enter the filename to save to:
If the file exists, you will be prompted to overwrite it:
Again, saving with GEM is much easier:
RECEIVE File from 850 / AtariWriter
Without GEM Enabled
With version 1 the only option is to receive via null serial connection to an Atari 850 interface connected to the Atari 8 bit computer:
With later versions, you can choose to receive from null modem connection or not:
If choosing not to receive from null mode, you are asked if you want to load from disk:
When loading from file, you need to enter the filename to load from:
With GEM Enabled
With GEM enabled, you select the receive method via dialog prompt:
If receiving via file, you select it via standard GEM file picker:
After import the name is displayed under the GEM menu:
QUIT
Trying to quit without saving the document in memory:
GEM Extras
With GEM enabled you get a few extra menu options and dialogs to make things easier.
Global Format dialog:
The next set of screen shots steps through the Configure STWE menu option. Each of these dialogs are accessible as separate menu options as well. First select the number of spaces a TAB represents (on file import).
Next, select the default file extension for the file picker dialogs:
Then, select the default background color:
Then you select the default global format options (as above). Last you are prompted to continue after being warned that the disk and ST Writer program file must not be write protected. The binary is modified:
Files
Distribution Contents
ST Writer uses Atari TOS formatted diskettes. The contents of the distribution is as follows:
- STWRITER.PRG is the main program file.
- XYZZX.DAT is the the printer configuration data. This is read each
time you print a file to the printer. By default STWriter supports
Epson printers. - CONFIG.TXT is the english readable version of the printer
configuration file. - CONFIG.TOS is the program which converts the printer configuration
found in CONFIG.TXT into the format needed in the file XYZZX.DAT. - XYZZX.TXT is merely a copy of CONFIG.TXT and is not always present.
File Dump
Here is a dump of an ST Writer file. Notice the “DO RUN RUN” at the start:
Printing
Configuration
Before printing, unless you have an Epson printer, you need to configure the ST Writer for your printer. This is a complex process of editing a configuring file, running a program, then launching ST Writer.
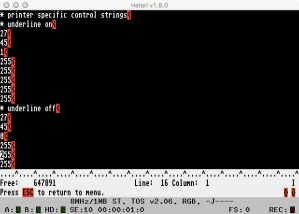
Editing the CONFIG.TXT file in ST Writer to add the required printer control codes for each printer function (have your printer manual handy):
Running the TOS program CONFIG.TOS to convert CONFIG.TXT to the required internal format for the file XYZZX.DAT:
Sample Output
The output here is plain ascii. No printer emulation was used.
Test file from AtariWriter printed to Atari 825 printer:
https://inverseatascii.files.wordpress.com/2015/10/iaftest_aw825.pdf
Test file from AtariWriter Plus printed to Epson FX-80 printer:
https://inverseatascii.files.wordpress.com/2015/10/iaftest-awpfx80.pdf
Test file from ST Writer printed to Epson printer:
https://inverseatascii.files.wordpress.com/2015/11/s2e41-prt-testdocument.pdf
Printing the file Index:
https://inverseatascii.files.wordpress.com/2015/10/s2e41-prt-05-index3.pdf
Instructions
Printed Manual download (pdf): https://inverseatascii.files.wordpress.com/2015/10/s2e41-prt-stwritermanual.pdf
Printed Help download (pdf): https://inverseatascii.files.wordpress.com/2015/10/s2e41-prt-stwriterhelp.pdf
Instructions
Using ST Writer to write Pascal code:
After compiling the Pascal code (IA.PRG) with OSS Personal Pascal, this is the result of my effort. Not bad for my first GEM program since 1987. A variation of this (BITS.PRG seen above) was then used to generate the dialog for the bit rating as seen at the bottom of this post:
Show Links:
- Inverse ATASCII YouTube demo ST Writer version 1: https://youtu.be/-g3FTIlv-mA
- Inverse ATASCII YouTube demo ST Writer Elite version 3: https://youtu.be/wnT06kQTbVg
- Inverse ATASCII YouTube demo ST Writer Elite version 4.8: https://youtu.be/Bk1xAU6oU-0
- Atari Mania: http://www.atarimania.com/game-atari-st-st-writer_23203.html
- AtariWriter Wiki (with ST Writer): https://en.wikipedia.org/wiki/AtariWriter
- Atari ST Wiki: https://en.wikipedia.org/wiki/Atari_ST
- ST Writer Secrets (Dr. Bruce Noonan): http://www.atarimagazines.com/startv1n3/STWriter.html
- ST Writer Secrets 2 (Dr. Bruce Noonan): http://www.atarimagazines.com/startv2n2/stwriter.html
- ST Report #906 (MultiWriter press release): http://www.atariarchives.org/cfn/12/05/03/0300.php
- MultiWriter press release (pdf version): https://inverseatascii.files.wordpress.com/2015/10/s2e41-prt-multiwriterrelease.pdf


6 thoughts on “S2E41 Atari ST Writer – Supplement”